------------------------ May 2018 ~ Sakura Padang Pasir

http://sakurapadangpasir121.blogspot.com/

This theme is Bloggerized by Sakura Padang Pasir - http://sakurapadangpasir121.blogspot.com/.

http://sakurapadangpasir121.blogspot.com/

This theme is Bloggerized by Sakura Padang Pasir - http://sakurapadangpasir121.blogspot.com/.

http://sakurapadangpasir121.blogspot.com/

This theme is Bloggerized by Sakura Padang Pasir - http://sakurapadangpasir121.blogspot.com/.

http://sakurapadangpasir121.blogspot.com/

This theme is Bloggerized by Sakura Padang Pasir - http://sakurapadangpasir121.blogspot.com/.

http://sakurapadangpasir121.blogspot.com/

This theme is Bloggerized by Sakura Padang Pasir - http://sakurapadangpasir121.blogspot.com/.

How to bypass Google account verification for HTC phones


How to bypass Google account verification for HTC phones

Unlike the procedure for LG phones, if you want to skip Google account verification for a HTC you will need a bit of extra time since there’s one additional step. But don’t worry, it’s not difficult. Just go on with the steps below.
HTC logo

FRP bypass for HTC instructions

  • Reset the phone and power it back on
  • Choose your preferred language, then tap on Start
  • Connect the phone to a Wifi Network (preferably your Home network), then tap on Next
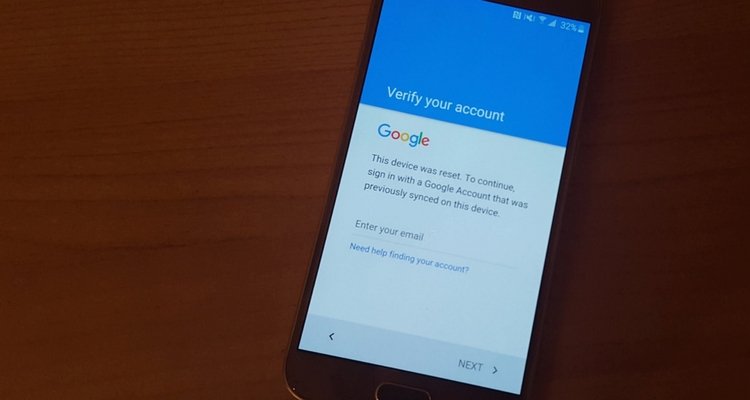
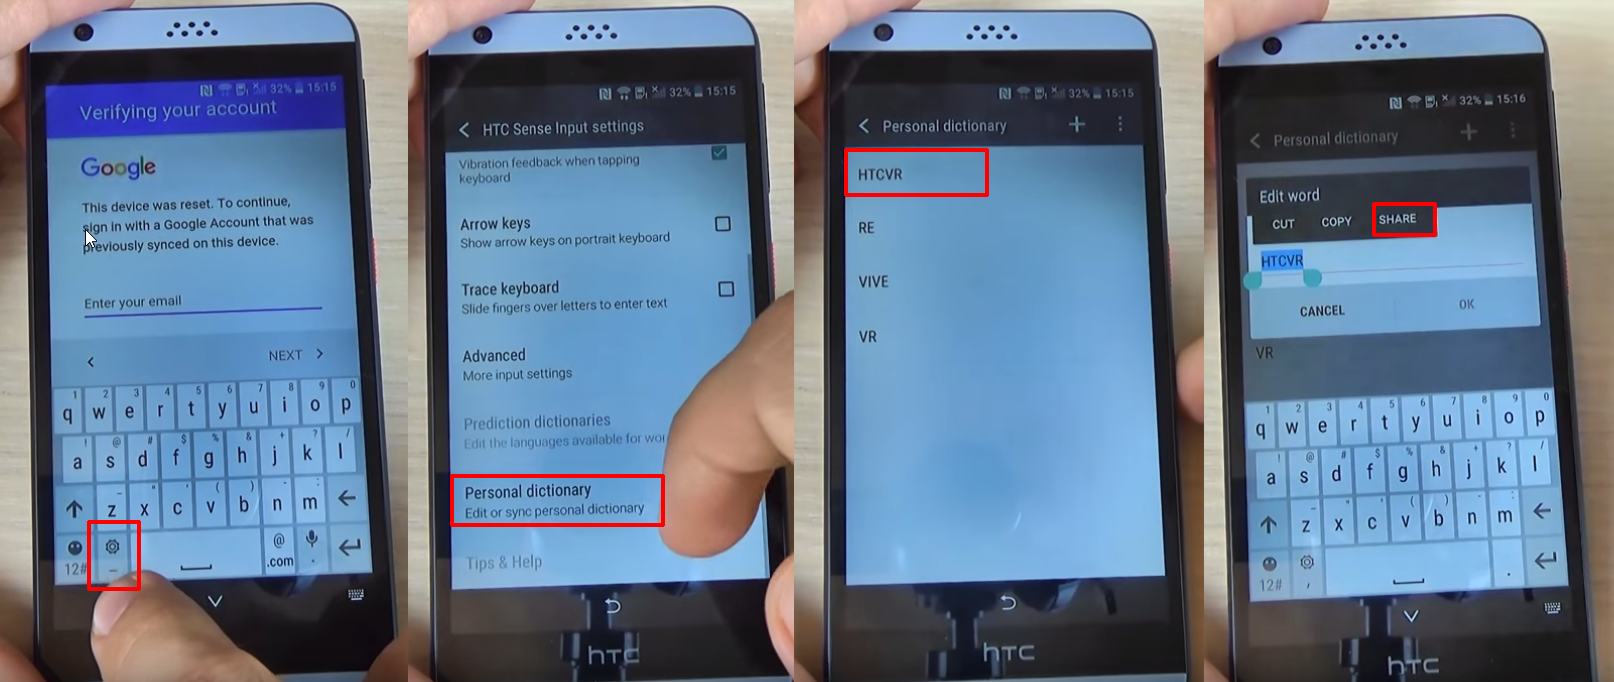
  • When the Verify Your Account screen comes up, tap on the email/phone field. This will open the keyboard
  • Long press on the Settings key. This will open the HTC Sense Input Settings screen
  • Here, tap on Personal Dictionary, then long press on HTCVR. After this, tap Share
Bypass Google account HTC 1
  • You will see some sharing options. Long press on the Gmail icon, which will open the App info page
  • Tap on Notifications, then on App Settings
  • Click on the three dots in the top right corner of the screen and select Manage Accounts. A pop-up message will appear. Tap Continue
Bypass Google account HTC 2
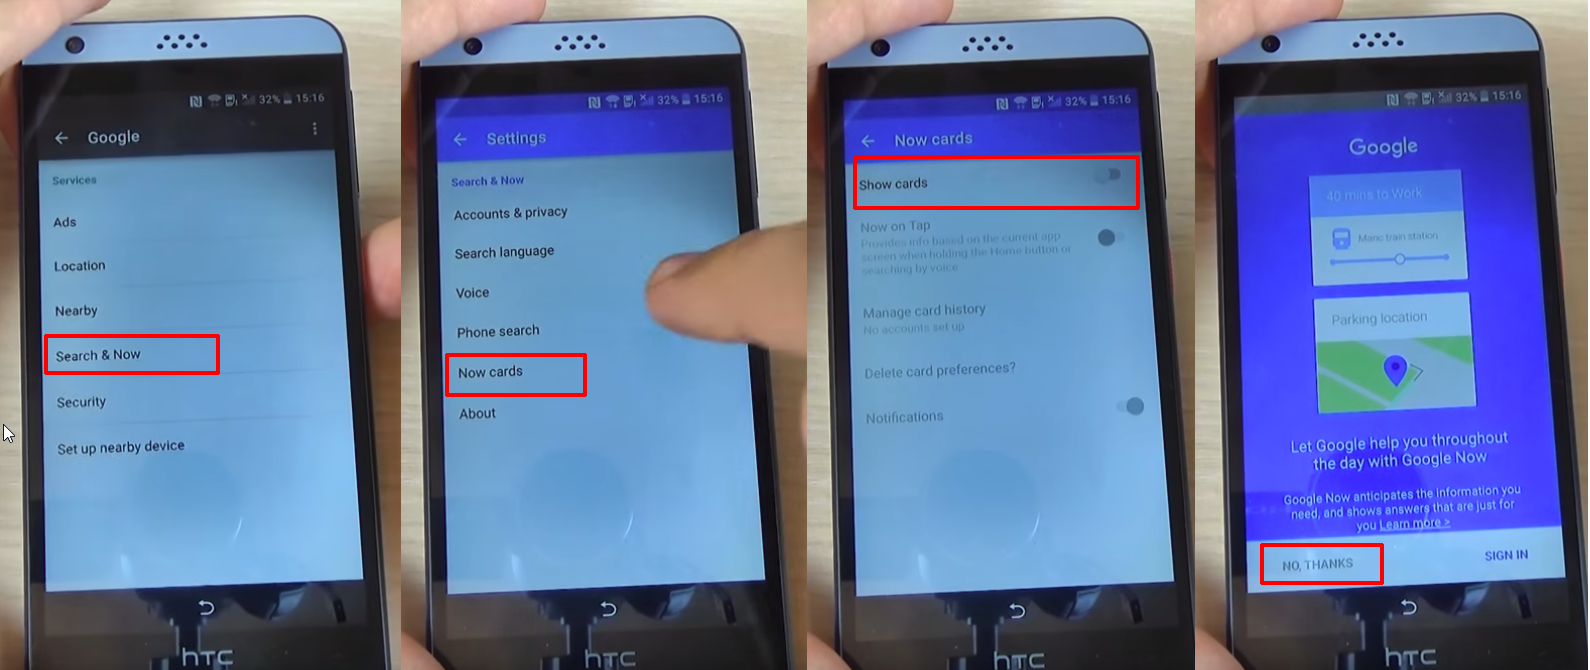
  • You should be redirected to your phone’s Settings menu. Scroll until you find Google and tap on it
  • From the Google submenu, tap on Search and Now, then select Now Cards and enable them, by tapping on Show Cards
  • On the next screen, select “No, Thanks”. This will get you to the Google search bar
  • In the search bar, type “Google” and tap on the first link that appears. When the page opens, tap on “No, Thanks” once again. This will take you to Google Search
Bypass Google account HTC 3
  • In search, type Google, then tap on the first result, which is Google Home.Tap on it
  • You will be prompted to set up Chrome, so hit the “No, Thank you” button
  • Search for Quick ShortcutMaker and open the second link that appears. From here, download “APK from APK 2.0”, using the link at the bottom of the page.
  • After downloading the file, go back until you see the screen where you can enable Show Cards and enable them. You will be prompted once again to set up Chrome, so hit “No, Thanks
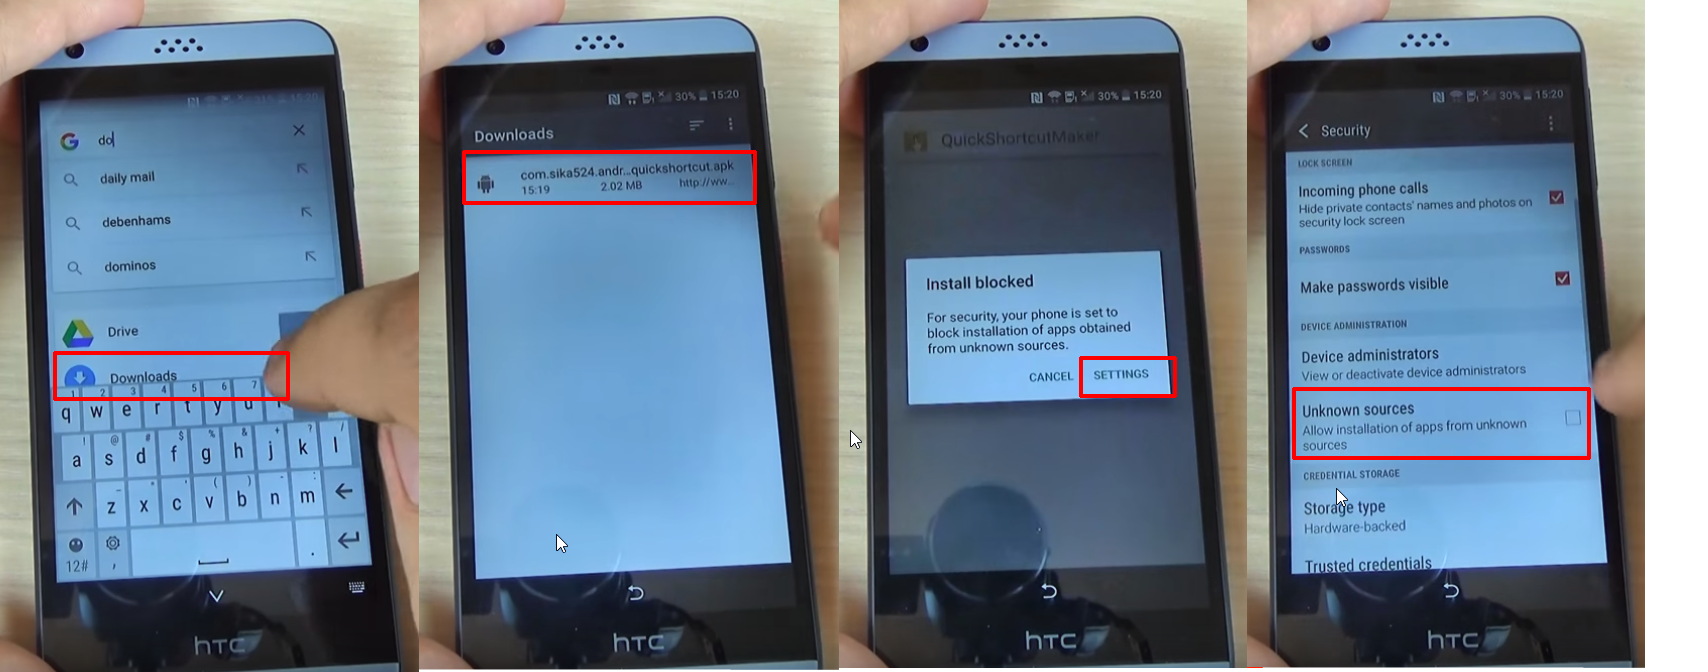
  • You will be taken to Search. Here, type Downloads, in order to access the folder where you saved the app
  • You will see the app, so tap on it, in order to begin installation
  • The phone will say the installation is blocked, due to security reasons, so tap on Settings in the pop-up window
  • Check Unknown Sources, then tap Ok
  • Go back and tap on the downloaded app once again, then on the Install button
  • Wait until the process is over
Bypass Google account HTC 4 

The app you’ve just installed is essential if you want to bypass Factory Reset Protection on HTC. And don’t worry, it’s completely safe and it won’t damage your phone. Ok, let’s see what’s next.
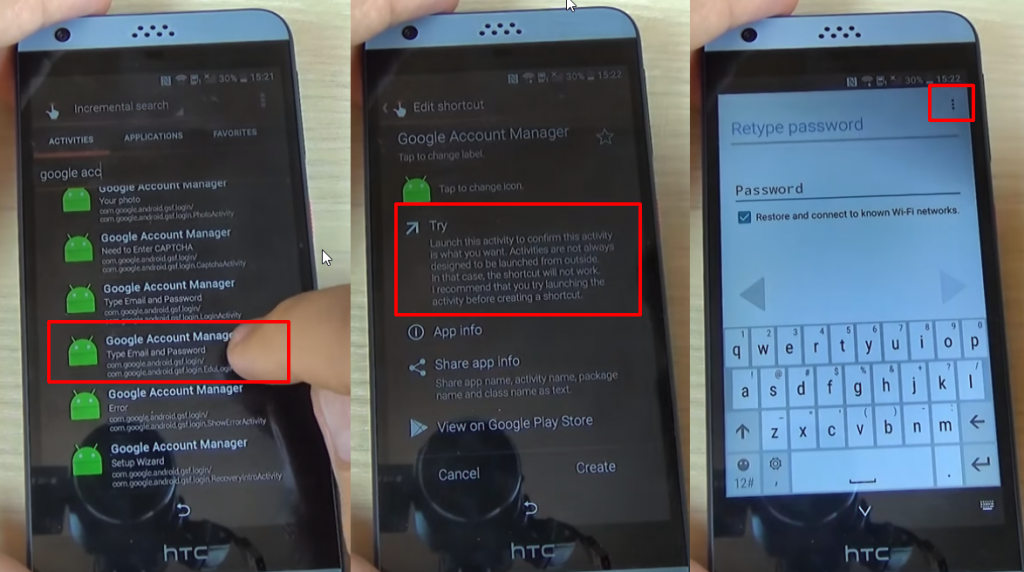
  • After the installation is completed, click on Open and look for Google Account Manager, with “Type E-mail and Password” written under. Tap on it
  • Tap on Try, then tap the three dots that appear in the Retype Password screen
  • Select Browser Sign-in, then Ok
Bypass Google account HTC 5
  • Enter a fresh Google account
  • Restart your phone and set it up again. You won’t see the FRP lock screen anymore
  • Go to the Settings menu > Backup & reset. Perform a factory data reset.                                                                 


How to bypass Google account verification for LG phones


How to bypass Google account verification for LG phones
The procedure for an LG handset can look a bit tricky and complicated at first, but don’t get discouraged. Simply follow the steps below and you should be able to get rid of the FRP lock.


LG logo


FRP bypass for LG instructions


  • Connect the phone to a Wifi Network (preferably your Home network)
  • Go back to the main Welcome screen and tap on Accessibility
  • From this new menu, tap on Vision, followed by Talkback option, in the next menu
  • Swipe up in this new menu and tap on Text-to-speech Output
Bypass Google account LG 1 

  • Tap the Gear settings icon from Google Text-to-speech Engine
  • Tap on Setting for Google Text-to-speech Engine
  • Here, you should see the Feedback menu. Tap on it until a new submenu appears.
  • You will see a field where you can type your feedback, as well as the “Include system logs” option. Right under it, you will see Terms of Service. Tap on those three words.
Bypass Google account LG 2

If you’ve reached this step, it’s great. You’re very close to the moment when you will bypass Google account verification on your LG.
After tapping on Terms of Service, a Google Chrome window will open. After it loads, follow these steps:
  • Tap the No, Thanks button when asked to sign in
  • Initially, you will be taken to the Terms of Service page. Tap the Google logo, in order to be taken to the homepage.
  • Type “Test” in the search bar and search for it
  • The first result should be from Wikipedia. Long press on the description under the title of the page. This will show a menu with two options: Copy and Share, as well as three vertical dots on the right side.
  • Tap on the three dots. This will reveal a new menu, with three options: Select all, Web search, and Assist. Tap on Assist. This will reveal the phone’s search bar.
Bypass Google account LG 3
  • Hit No, Thanks where you are asked to sign in.
  • Type Settings in the search bar and open it
  • After entering the Settings menu, look for Apps and tap on it
  • In the Apps menu, tap on the three dots from the top right corner and pick the Show System option. You will see an entire list of your phone’s system apps
  • In the list, look for Setup Wizard and tap on it
Bypass Google account LG 4
  • Tap Force Stop, then OK
  • Stay in the Setup Wizard menu, then tap on Storage. You will see the Clear Cache option. Tap on it

Another important step is ready. You’re almost done!

  • Tap twice on the back key, in order to return to the Apps list
  • From here, tap on Google Play services. Repeat the steps above: tap on Force Stop, then on Disable, followed by OK.
Bypass Google account LG 4
  • Using the back key, go back to the Settings menu
  • Restart your device. This will bypass Google account verification for LG
After the phone restarts, you need to complete your initial setup. Without connecting the phone to a Wi-Fi network, tap on the Next arrow from the phone’s welcome screen. After this, tap Skip.
If there is a Wi-Fi connection on your phone, long press on Wi-Fi network, then tap on Forget Network, then tap on Next. Tap Skip until you see the Protect this Device option, which needs to be unchecked.
After this, skip all screens until you get to the list with the Google Terms and Conditions. Check I agree and tap on Done.
Ok, just one more step. In order to successfully bypass Google verification, you need to reset the LG phone. Again, make sure you DO NOT connect it to Wi-Fi!


    How to bypass Google account verification for Samsung phones


    How to bypass Google account verification for Samsung phones

    Samsung handsets are among the best selling devices in the world, so this issue is very often encountered by their users, especially those who get used phones. If you want to learn how to bypass a Google account on a Samsung Galaxy, you can use the method below.
    Samsung logo

    FRP Bypass for Samsung instructions

    After performing a factory reset on the phone, wait until it reboots and prompts to choose a language. After choosing it, proceed to the next steps:
    • Connect the phone to a Wifi Network (preferably your Home network)
    • The next screen will ask you for the Google Account
    • Tap the text field in which the account should be inserted until the Keyboard comes up
    • Tap and hold the “@” character until a Settings menu pops up
    • Select Google Keyboard Settings
    • Tap on the 3 dots in the top part of the screen (or More depending on what Android OS you are running)
    • Select the Help&Feedback item and select any item in the list that will follow
    Bypass Google account Samsung 1
    • From the Help section, tap on Using Google Keyboard.
    • Long press to select any text on this page and click on Websearch in the upper right corner
    • A search field will be shown (delete the text inside the search field)
    • Type Settings in the search field
    Bypass Google account Samsung 2
    • Scroll down until you find“About Phone” and tap it.
    • Enter the menu and look for Build Number. Tap 7 times on the Build Number to enable Developer Options
    • Return to the previous menu and open the Developer Option that just appeared
    • Allow OEM Unlocking and tap Back two times
    • Restart the device
    • Connect it to Wifi again
    • Notice how you won’t be prompted to log in the previous Google Account and instead the phone will ask you to ADD a new Google Account
    • Add the new account and your phone will be ready to use.

    How to bypass Google account verification


    Along with the Android Lollipop 5.1 update, Google has introduced a new security feature designed to render the phone unavailable for usage in the unfortunate event when it might get stolen or lost, therefore protecting all the important data on it.

    However, this feature, despite being very useful, can cause some serious problems and put people in a situation in which they need to bypass Google account verification, so they can use the phone.

    What’s the Google Account Verification and how it works?

    Let’s say that you just lost your phone and another person finds it. Normally, this person will not be able to use the phone if you have already set up a screen lock pattern or security PIN.
    Before Android 5.1 Lollipop, this wasn’t such an issue, as a simple factory reset would’ve bypassed the lock.

    However, after Google introduced the Google Account Verification or Factory Reset Protection (FRP), this didn’t work anymore. Thanks to the FRP lock, the phone becomes unavailable if the person who performs a factory reset doesn’t have the credentials of the Google account which was previously used to log on the phone.

    They will get the “This device was reset, to continue sign in with a google account that was previously synced on this device” message, meaning that the phone is useless, unless they bypass the Google account.

    Automatically, this can have a big impact on users who buy a phone from a third party seller and cannot get in touch with the person that sold them the phone. Most users reported not being able to use the phone because they could not get past the screen where the phone asks for the Google Account. If you’re in the same situation, I bet that you have one this question: Is there any method to bypass this lock?

    Verify Google account


    Below you will find all the instructions you need to bypass Google account verification for some of the most popular phone brands.